

The problem with image uploads
Many services - including web and mobile apps - allow for their users to upload imagery. This could be to enable users to upload an avatar image or perhaps create a gallery of image files.
Either way, many photos contain some degree of sensitive metadata information as part of their EXIF data. For example, if you take photos using your phone, it is likely that the camera application will embed metadata into the image file it creates. This could include the geocoordinates of the position from where the photo was taken, the make and model of the camera device, as well as lots of other data (exposure time, focus, balances, etc).
This data is useful, since it allows photo-viewing applications to display your images on a map or to allow for examining files in more detail.
However, if a user chooses to upload such an image file to a service, unless the metadata is correctly stripped out the exact same file can be downloaded by other users - which could give them access to sensitive information. For example, if someone created an image post along with some text describing themselves as being at home, other users could quickly (and accurately) discover where the user lives.
In this post I will cover:
- A brief introduction to the Pillow image processing library
- How to use Python to process images in order to remove EXIF data
- How the approach can be automated when using S3 and AWS Lambda
A basic approach to removing sensitive information
Luckily, removing sensitive EXIF data is not too difficult to do. This post leverages Python for demonstrating the approach, however the process would be very similar in other languages too. As such, the discussed method could easily be included as part of a Flask or Django service, or a standalone Python application.
Specifically, I will make use of the Pillow library for Python - it is a very useful tool for manipulating images.
This post does not cover the process or code required to actually upload a file from a client, since the following approach is agnostic as to whether the service is part of a mobile app, a web app, a simple API, a local application, or anything else.
Another thing to remember is that orientation data (i.e. the positioning of the camera when the photo was taken) is also included in the EXIF data. This information tells image viewers with which rotation to display the image, and so we will need to handle this too.
The following provides a basic approach to accomplishing what we are trying to achieve.
First, install the needed dependency:
poetry add pillow
Or use pip if preferred.
You’re then ready to write your code, assuming the Python application has a reference to the image data (e.g. by reading from a request stream, a file, or elsewhere) called image_data.
# At the top of the file, include PIL in your imports:
from PIL import Image, ExifTags
import io
...

# Calculate orientation key in ExifTags
orientation = None
for orientation in ExifTags.TAGS.keys():
  if ExifTags.TAGS[orientation] == 'Orientation':
    break

# Create a new PIL image from the image_data:
image = Image.open(image_data)

# We need to use the orientation EXIF info to rotate the image:
image_exif = image.getexif()
if image_exif:
  exif = dict(image_exif.items())
  if exif.get(orientation) == 3:
    image = image.rotate(180, expand=True)
  elif exif.get(orientation) == 6:
    image = image.rotate(270, expand=True)
  elif exif.get(orientation) == 8:
    image = image.rotate(90, expand=True)

# Retrieve the image contents as a list representing a sequence of pixel values:
image_contents = list(image.getdata())

# Create a new image based on the original, but without the full EXIF data:
new_image = Image.new(image.mode, image.size)
new_image.putdata(image_contents)

# Finally, create a new buffer object and put the new image file data into it:
new_image_data = io.BytesIO()
new_image.save(new_image_data, 'PNG') # Or the file format needed
new_image_data.seek(0)
And that’s it. The new_image_data object can now be sent to wherever you need it to be - the filesystem, another server somewhere, or to a storage solution like S3. For example, you may want to give the new image the same filename such that it overwrites the original.
During this process you can also leverage Pillow to do some additional image processing, such as resizing, cropping, colour transformations, or even statistical analyses. I recommend checking out the handbook for more information on this.
Working with Amazon S3
If you use S3 as a storage backend, you can easily add an S3 trigger - along with a quick Lambda function - to automatically handle this process for you without the need for additional servers or changes to your existing application.
This process will cause S3 to automatically trigger your Lambda function each time a new file is uploaded to your bucket.
To start with, bundle the above code into a function called handler that accepts an event object as an argument. You’ll also need to import the boto3 library:
# Include the previous imports from above...

# Also import boto3 and os:
import boto3, os

# Create a new function
def handler(event):
  # Create a new S3 client:
  s3 = boto3.client('s3')

  # Get the pathname to the uploaded object from the event:
  file_path = event['Records'][0]['s3']['object']['key']

  # Extract the file name and extension
  file_name, file_extension = os.path.splitext(file_path)

  # Check the file is an image (and not another type of file, like a PDF):
  if file_extension.lower() not in ['.jpg', '.png', '.jpeg']:
    # If not an image, bail out early:
    return

  # Retrieve the object's tags. Here we can check if the file
  # has already been processed in order to prevent an infinite loop:
  tagging = s3.get_object_tagging(Bucket='mybucket', Key=file_path)
  object_tags = tagging['TagSet']

  # Go through the tags and exit if EXIF data has already been stripped:
  for tag in object_tags:
    if tag['Key'] == 'ExifStripped' and tag['Value'] == 'True':
      return

  # Retrieve the image from S3 into the image_data object:
  image_data = s3.get_object(Bucket='mybucket', Key=file_path)

  # Now process the file by including the earlier code
  ...
  ...

  # Finally overwrite the existing S3 object with the new image file data and tag:
  s3.put_object(Bucket='mybucket', Key=file_path, Body=new_image_data, Tagging='ExifStripped=True')
Replace mybucket with the name of your existing S3 bucket. Depending on your setup you may need to add additional configuration to the S3 client (such as the region of your bucket).
We use S3 object tagging to tag files we’ve already processed. Otherwise the final put_object call would result in S3 recursively calling the function again and again.
Next, deploy the above function to AWS Lambda - either through the command line or by copying the code into the AWS web interface. You’ll need to name your function appropriately (e.g. image_handler) and remember to register the handler function as the Lambda handler.
You should assign a suitable IAM role that allows the function to read and write from and to your S3 bucket, and also to read and write tags. I won’t cover this here, since if you already use S3 I’ll assume you’re also familiar with IAM.
To create the trigger in the S3 console, navigate to your bucket’s “Properties” tab and click the “Create event notification” button. Go through the form and configure the trigger based on your needs, including your new Lambda function in the “Destination” section.

Configure the basic details as above, replacing the information as needed.
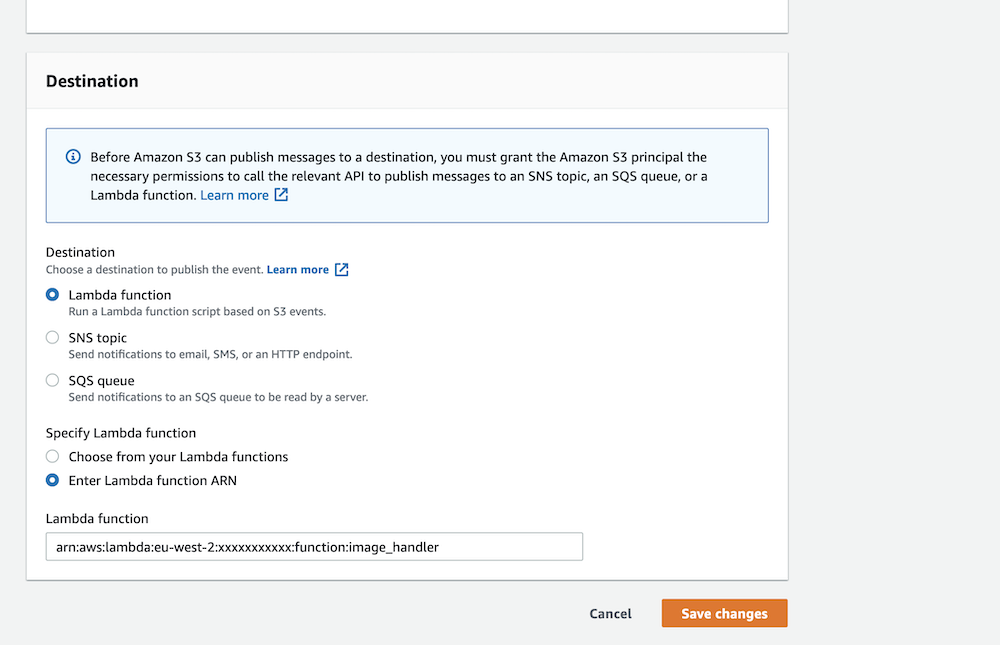
Finally, choose your Lambda function from the list as a destination, as shown above.
Conclusion
In this post I have talked about one method for handling uploaded images in order to remove sensitive EXIF data and also explained how the same process can be used to incorporate other types of image processing.
Whilst the approach won’t be suitable for everyone or for all use cases, it should provide additional means for protecting the security of users of your services and applications.
Postscript
Update (February 2023): Thanks to Ercan for pointing out an omission in this blog post relating to calculating the orientation key.