
Most applications include some sort of outbound transactional email as part of their normal function. These email messages could be to support account-level features (such as password-resets) or to notify the user about activity relevant to them.
In the latter case, such emails might be read, and then archived or deleted by the user, without further direct action. They aren’t typically designed to be something one actions or replies to - they’re mostly there to bring you back into engaging with the platform.
However, what if your users could interact with your platform via email to some extent? For example, if someone were to send you a message on the platform - and you receive an email notifying you about the message, along with its contents - then the natural thing would be for you to be able to click “reply” to the email and write a message back.
It is probably kinder to the user to provide this option, rather than always sending from a noreply@ type address (since everyone has email clients wherever they go), and it also means that your service sees more interaction (even if indirectly).
In this post I will cover an approach to enabling users to be able to simply click “reply” to transactional emails, and to allow the replies to be processed by the platform.
Transmitting and receiving emails
Luckily, many current transactional email providers make it quite straight-forward to support this sort of functionality.
I will talk about Sendgrid as a transactional mail provider for the benefit of this post, and will use a Python Flask app demo for handling the inbound webhooks from Sendgrid.
Essentially, the flow will be the following:
- User “A” sends user “B” a message in our platform
- The platform sends an email to user “B” containing the message, with a special
Reply-Toheader - User “B” writes a message back to user “A” by directly replying to the email
- Sendgrid processes the incoming email and sends a
POSTrequest with the details back to our platform - Our platform receives the webhook from Sendgrid, reads the message and headers and takes action.
Configuring the transactional mail provider
The first thing to do is to set-up a mail provider we can use for outgoing and incoming email messages. As mentioned, in this post we’ll discuss Sendgrid, but others would also do the job (such as Mailgun).
Set up an account on Sendgrid and validate the domain name you’ll use to carry the email messages via your DNS manager. In this post we’ll assume the domain is mail.example.com. Copy and paste the needed connection details (such as API tokens) and configure your app to send mail in the documented way (I won’t cover that in this post, as it is out of scope).
You’ll also need to configure your domain’s DNS with an MX record to enable Sendgrid to receive email sent to addresses at your domain. The details are as follows:
- Host:
mail.example.com(replace this with your actual domain) - Type:
MX - Server/target:
mx.sendgrid.net. - Priority:
10
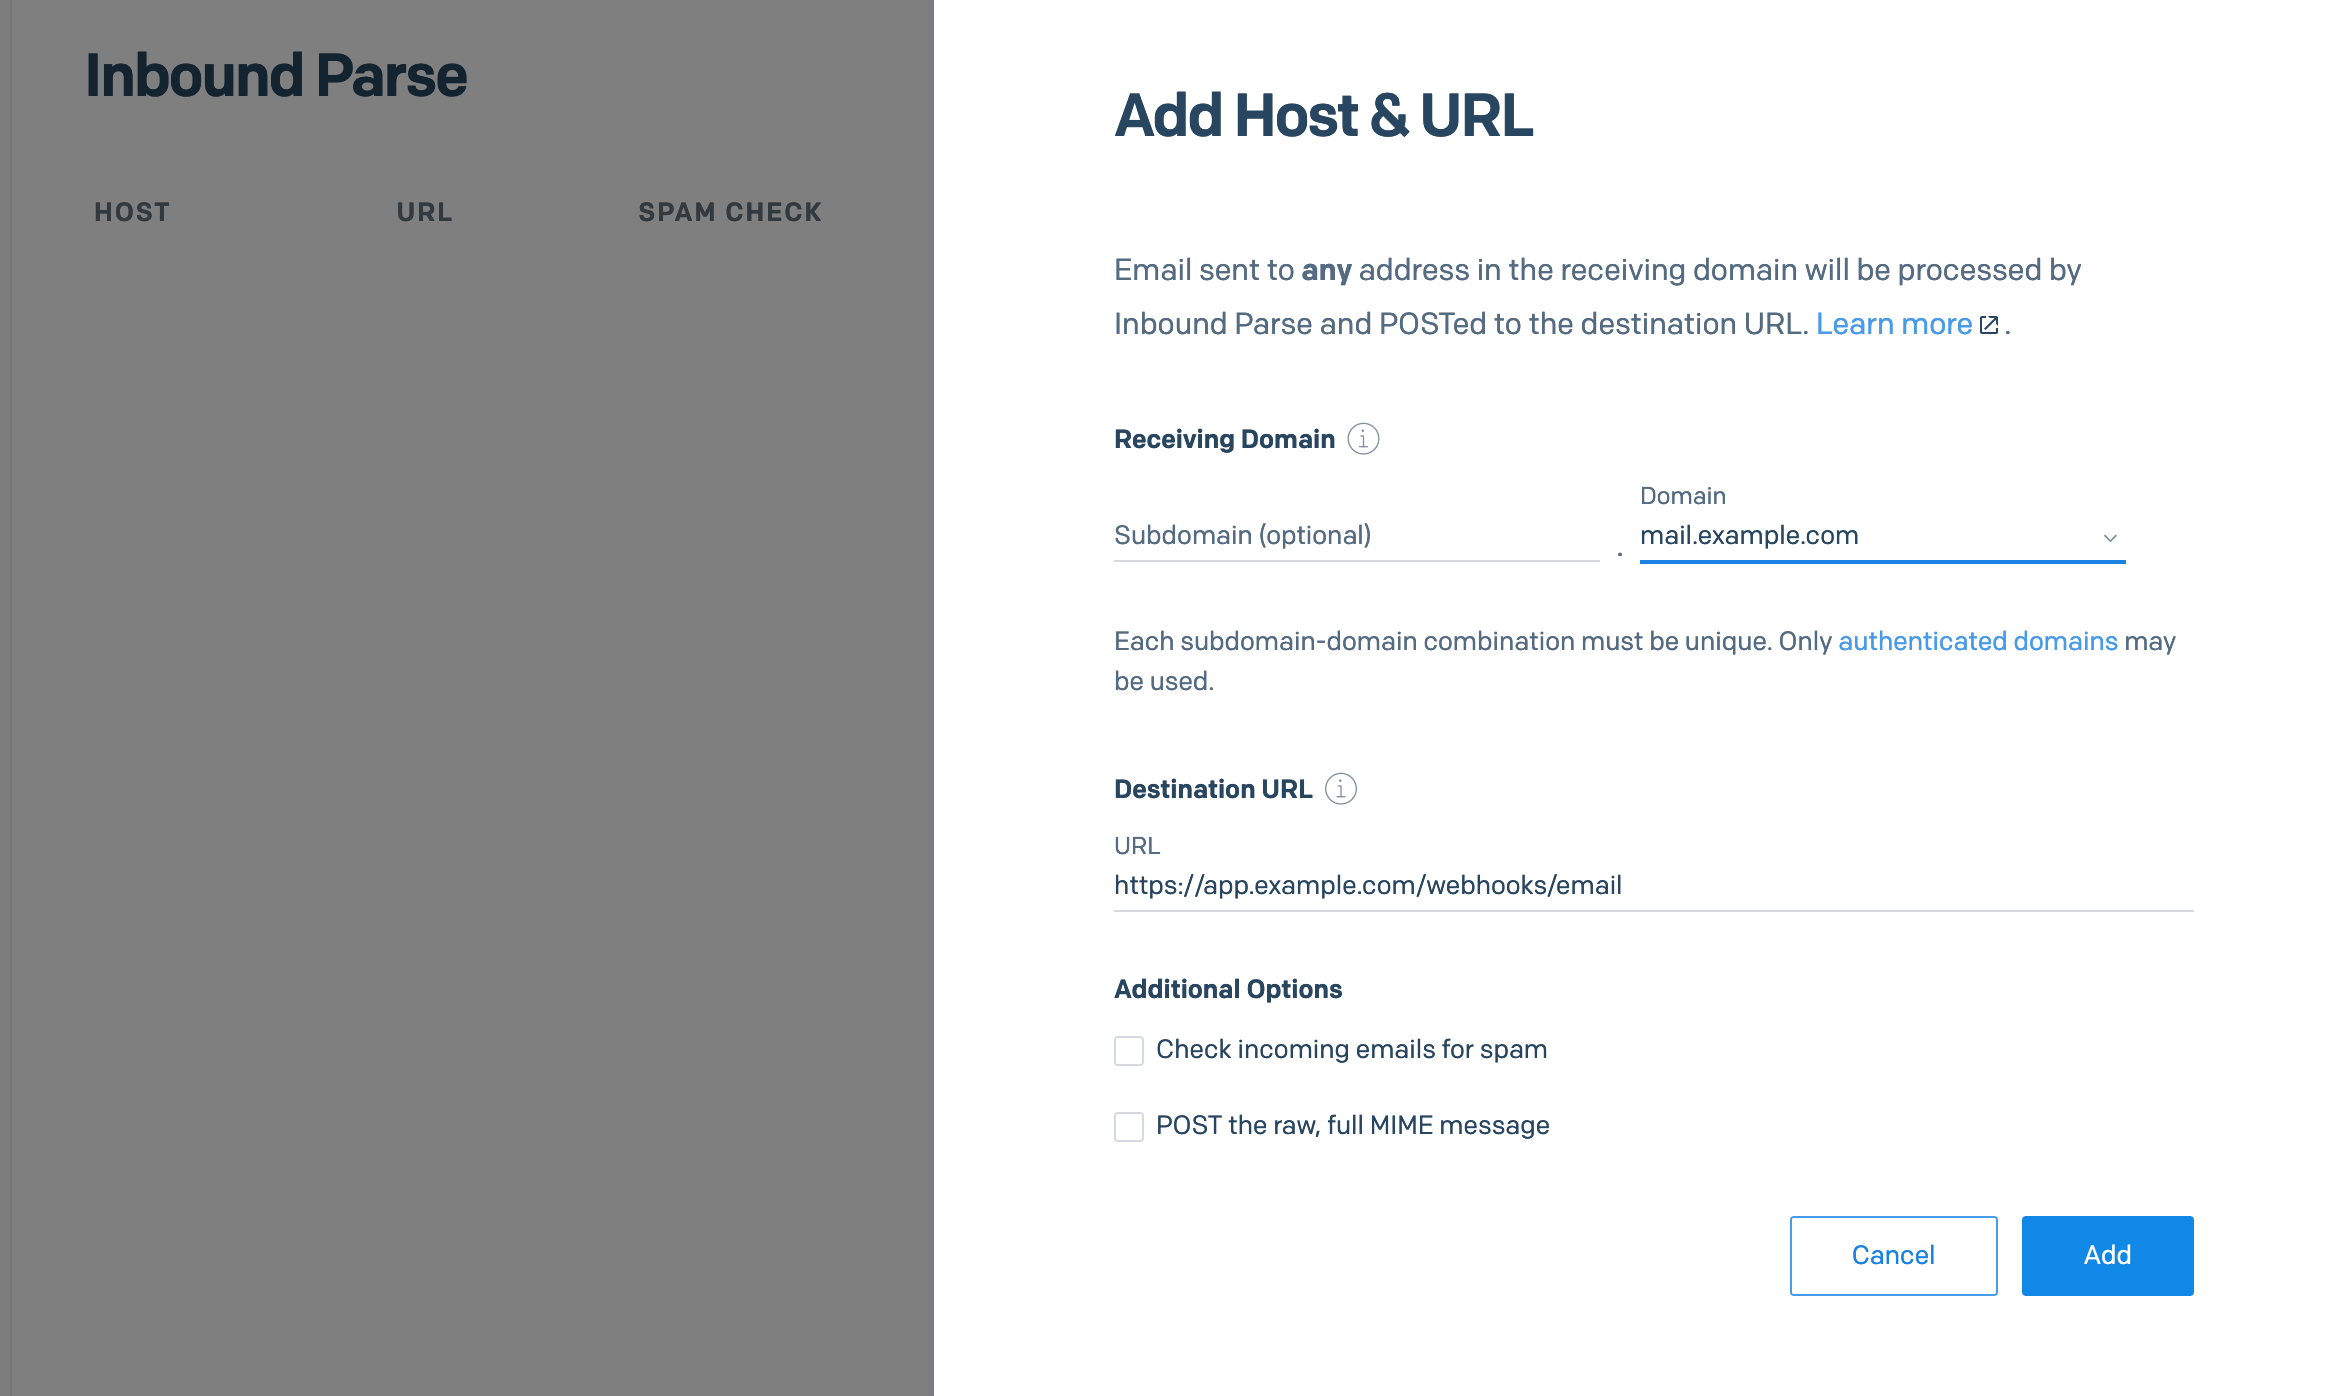
Next, we need to tell Sendgrid to handle the inbound messages. For this, navigate to Settings -> Inbound Parse on the Sendgrid dashboard (or use this direct link). Click “Add Host & URL” and enter the details as needed. In the example below, I have configured Sendgrid to handle all email sent to anything@mail.example.com and to POST the parsed email to our app (https://app.example.com) at the /webhooks/email route.
Once that’s done, we can close the Sendgrid manager.
Sending notification emails
Next, we need to make a change to the way we send our notification emails to users. For now, we’ll just focus on the “new message” event, but the same process could also be applied to other types of events in our platform.
The Reply-To field of an email message contains an email address, and tells standards-compliant email clients to use this address (instead of the From address) when users click the “Reply” button on the email.
We will need to add this field to outbound emails notifying about new messages such that Sendgrid can pick them up and we can process them later. There are various ways to achieve this, depending on your existing approach to sending transactional mail, but the below is an example in Python (given we know the message_id of the message we are notifying about):
msg = MIMEMultipart('alternative')
msg.attach(MIMEText(text, 'plain')) # add other fields to the email
msg['Subject'] = subject # add a subject line
msg['To'] = ', '.join(to) # add "to" addresses (there can be more than one!)

msg['Reply-To'] = f'message.{message_id}@mail.example.com'

# Continued mail logic...
In this example, we have specified a Reply-To address that will look a little like this: message.xxxyyyzzz@mail.example.com. This means that when a reply to this email comes in, we can use the To field of the reply email to work out what the message is about - in this case a reply to the message with an id of xxxyyyzzz. We’ll cover this later.
Since we’ve already configured Sendgrid to receive all emails sent to @mail.example.com, then we know that it will try and POST the data back to our app once they’ve been received.
Handling the inbound emails
The final step is to ensure our app can handle the inbound webhooks from Sendgrid.
As we saw earlier, we told Sendgrid to send the details of incoming emails to our app’s /webhooks/email route, and so we will need to set that up. We also know that it will be a POST request and the payload will be standard multipart form data.
Below I have included an example of how we might handle this in a Python Flask app, but the same should be similar for other frameworks and languages:
@app.route('/webhooks/email', methods=['POST'])
def parse_email():
  to_address = request.form.get('to')
  from_address = request.form.get('from')
  text = request.form.get('text')
  subject = request.form.get('subject')
  print(to_address, from_address, subject)
  return jsonify({'processed': True})
We could then deploy our app, send a couple of emails to addresses the app can receive (e.g. test.1234@mail.example.com) and view the app’s logs to make sure everything is coming through OK.
Once we’re happy with the basic setup, we can make changes to the parse_email function to actually do something useful. For example:
  # function definition, etc.
  email_user = to_address.split('@')[0]
  email_topic = email_user.split('.')[0] # `message`
  if email_topic == 'message': # Branch code depending on the type of message
    email_topic_id = email_user.split('.')[1] # `xxxyyyzzz`
    message = db.getMessageWithId(email_topic_id) # Replace with your own database logic
    from_user = db.getUserWithEmail(from_address) # Get the originator user
    if not message or not from_user:
      # Handle not found cases
    if from_user.id not in message.participants:
      # Handle case where the user isn't allowed to reply to the message
    db.createNewMessage(from_user.id, text, in_reply_to = message.id) # Create the message

  return jsonify({'processed': True})
In this example we have included some checks to ensure the user exists and has the permission needed to reply to the message. We parse the relevant message details from the From field as discussed in the previous section.
Conclusion
We’ve now run through the complete end-to-end set-up; users can now click “reply” to emails in order to send content back through to our platform.
Of course, this approach isn’t perfect. For example, changes would be needed to handle the following:
- Newly-created messages may include quoted content in the email that we’d need to remove (and things like signatures).
- We should add extra text to our outbound email telling users that they can reply to it.
However, hopefully this post has set the scene for how one might go about implementing such a system in their own software!