
Loading indicators
In user-facing software, loading indicators are extremely important to let your users know that something is happening. This is the same no matter whether your software is a CLI program, a GUI application, a web app - or anything else.
Without such indicators, users of your software may become frustrated, or assume the program has crashed, and try to close it or leave.
Generally speaking, developers should try to keep long-running tasks to a minimum (or even offload them to a cron-job or an asynchronous server-side worker). However, in some cases this is not possible. For example, in a cloud-based file storage solution, in which uploads and downloads are a core and direct user-facing feature, the user must wait until a bunch of files finish uploading - though any post-processing can of course still occur in the background afterwards.
A loading indicator can be as simple as a Loading... string (appropriate for CLI apps) or perhaps a spinner (appropriate for mobile and web apps). However there are lots of other interesting approaches to this too.
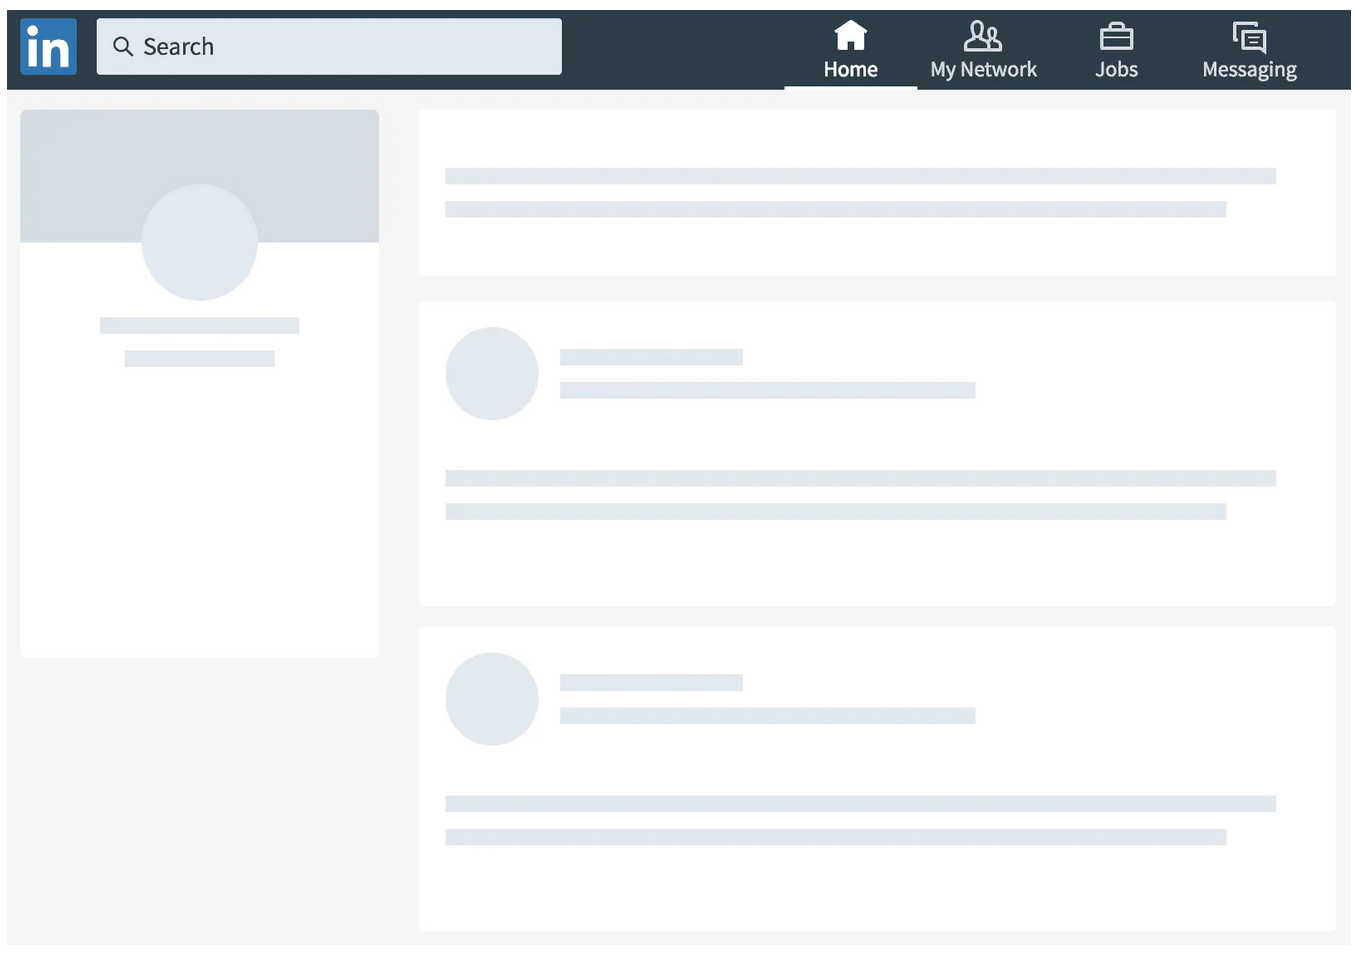
For graphical user interfaces - particularly on the web - using placeholder layouts (or “skeleton screens”) is a great way to give the user an idea of what to expect in terms of layout before the actual data finishes loading and rendering.
Loading text vs images
In a GUI or web app, text data is quick to load due to its smaller payload size. For example, when making a request to a webpage containing a mix of text and larger images, the text will load first and render and the user must then wait until the images finish downloading before they can be displayed.
This may cause the page to shift about once the images do load and get rendered on-screen - this is particularly annoying if the user has already begun reading and lose their point in the document as elements get re-positioned.
One method to avoid this is to show an image preview, which gets rendered at the same time as the text. The preview can then be “filled in” with the real image once it loads.
To get an image preview on-screen at the same time as the surrounding text and other components one can deliver a smaller version of the image alongside the rest of the data. For example, by generating and delivering an inline data URL of an image directly within the HTML returned from the server.
Modern web browsers are remarkably efficient at rendering this type of thing. However, it does require that you do some (probably) server-side image processing in order to derive a compressed version of the image before returning it in your HTTP response.
Blurhash
A perhaps nicer way of accomplishing this is to use Blurhash. This tool enables the derivation of a compact string representation of an image that can easily be stored alongside your other data - right in your database - and can easily be returned in API payloads.
Essentially, the library takes a “hash” of the image, which results in a short string. This string can then be decoded into a smaller image that can be rendered.
As an example, we can use this picture of my dog:

Using Blurhash to encode this image, the following string is returned: URH_SPDl_HxZItM|Iqt7EQxrIpNI9uj?jboM. When decoding this string back into an image we get something like the below:

It is clear that the second image is an approximation of the first. Given that the hash string is so short, downloading and rendering this as a placeholder before the full image itself downloads is quick and easy. It gives a nice preview of the image to the user for the short time it takes for the full image to load.
Blurhash offers additional ways to tweak the hashing algorithm (e.g. to make it more or less “detailed”), and has implementations for many different languages and frameworks - across desktop, mobile, and web.
I recommend checking out the documentation for more information on this.
Using Blurhash in a JavaScript app
If you are writing a webapp, this section may help you get off the ground with Blurhash.
Use of this library involves two steps; deriving the string “hash”, and then rendering this string as an image placeholder. To get started add blurhash to your project (e.g. with yarn add blurhash).
First of all we’ll look at getting the Blurhash string from an image. For this, we can do the processing browser-side to save on server resources. Assuming the user has just selected an image file for upload, the approach relies on drawing the specified image file to a hidden canvas that can be used to take the hash. The JavaScript code below illustrates this process.
import { encode } from 'blurhash';

const getHash = file => {
  const canvas = document.createElement('canvas');
  const context = canvas.getContext('2d');
  const image = new Image();
  return new Promise((resolve, reject) => {
    image.onload = () => {
      canvas.width = image.width;
      canvas.height = image.height;
      context.drawImage(image, 0, 0);
      const imageData = context.getImageData(0, 0, image.width, image.height);
      resolve(encode(imageData.data, imageData.width, imageData.height, 4, 4));
    }
    image.src = URL.createObjectURL(file);
  });
}

// Elsewhere in your code (e.g. once the user selects a file)
const hash = await getHash(file);
The hash variable can then be sent up to your API and stored safely in your database.
To later render the Blurhash string, it can be returned directly from your API along with other relevant information and then decoded into an image.
Below is a React component - BlurrableImage - I use to render an image’s Blurhash whilst it loads in the background. Once loaded, the image gets rendered in place of the Blurhash.
import React, { useState, useEffect, useRef } from 'react';
import { decode } from 'blurhash';

function BlurrableImage({ src, blurHash }) {
  const [loaded, setLoaded] = useState(false);
  const canvasRef = useRef();

  useEffect(() => {
    const canvas = canvasRef.current;
    const context = canvas.getContext('2d');
    const imageData = context.createImageData(200, 200);
    const decodedHash = decode(blurHash, 200, 200);
    imageData.data.set(decodedHash);
    context.putImageData(imageData, 0, 0);
  }, [blurHash]);

  return (<>
    {/* This image will never display. We just use it so we know when the browser has downloaded it. */}
    <img
      src={src}
      onLoad={e => setLoaded(true)}
      style={{ display: 'none' }}
    />

    {/* When the image has been downloaded, we can render it. E.g. here we use it as a background image. */}
    {loaded &&
      <div style={{
        width: 200, height: 200,
        backgoundSize: 'cover',
        backgroundPosition: 'center',
        backgroundImage: `url(${src})`
      }} />
    }

    {/* We only show this canvas while loaded == false */}
    <canvas
      width={200} height={200}
      ref={canvasRef}
      style={{ display: !loaded ? 'block' : 'none' }}
    />
  </>);
}

export default BlurrableImage;
If you display images in your application, Blurhash might offer a good solution for keeping your interfaces speedy and intuitive.